Games202 Hw5 JBF and SVGF
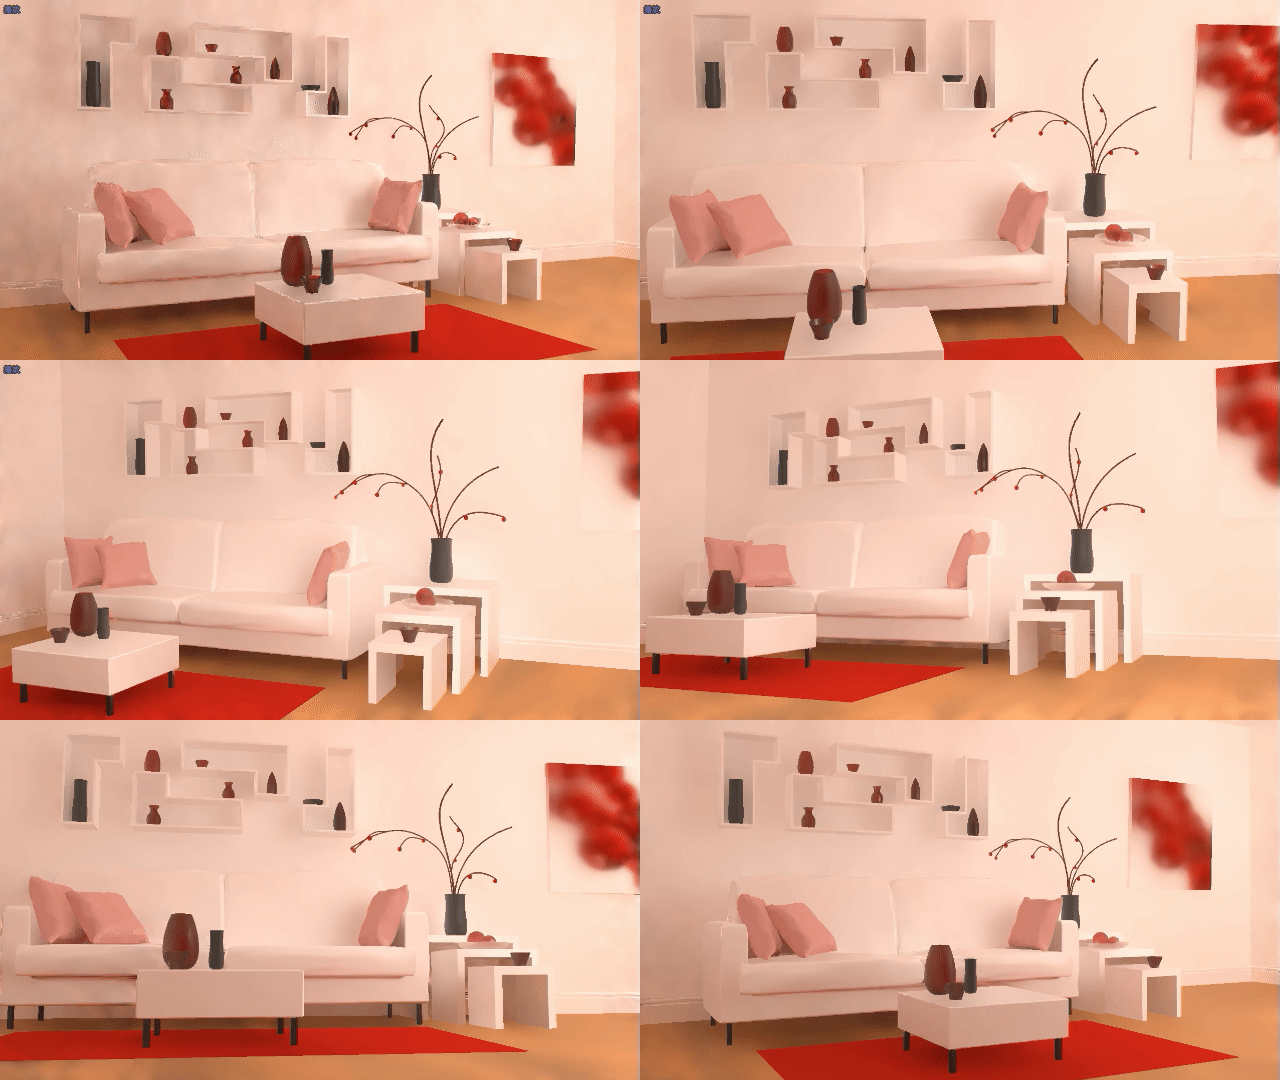
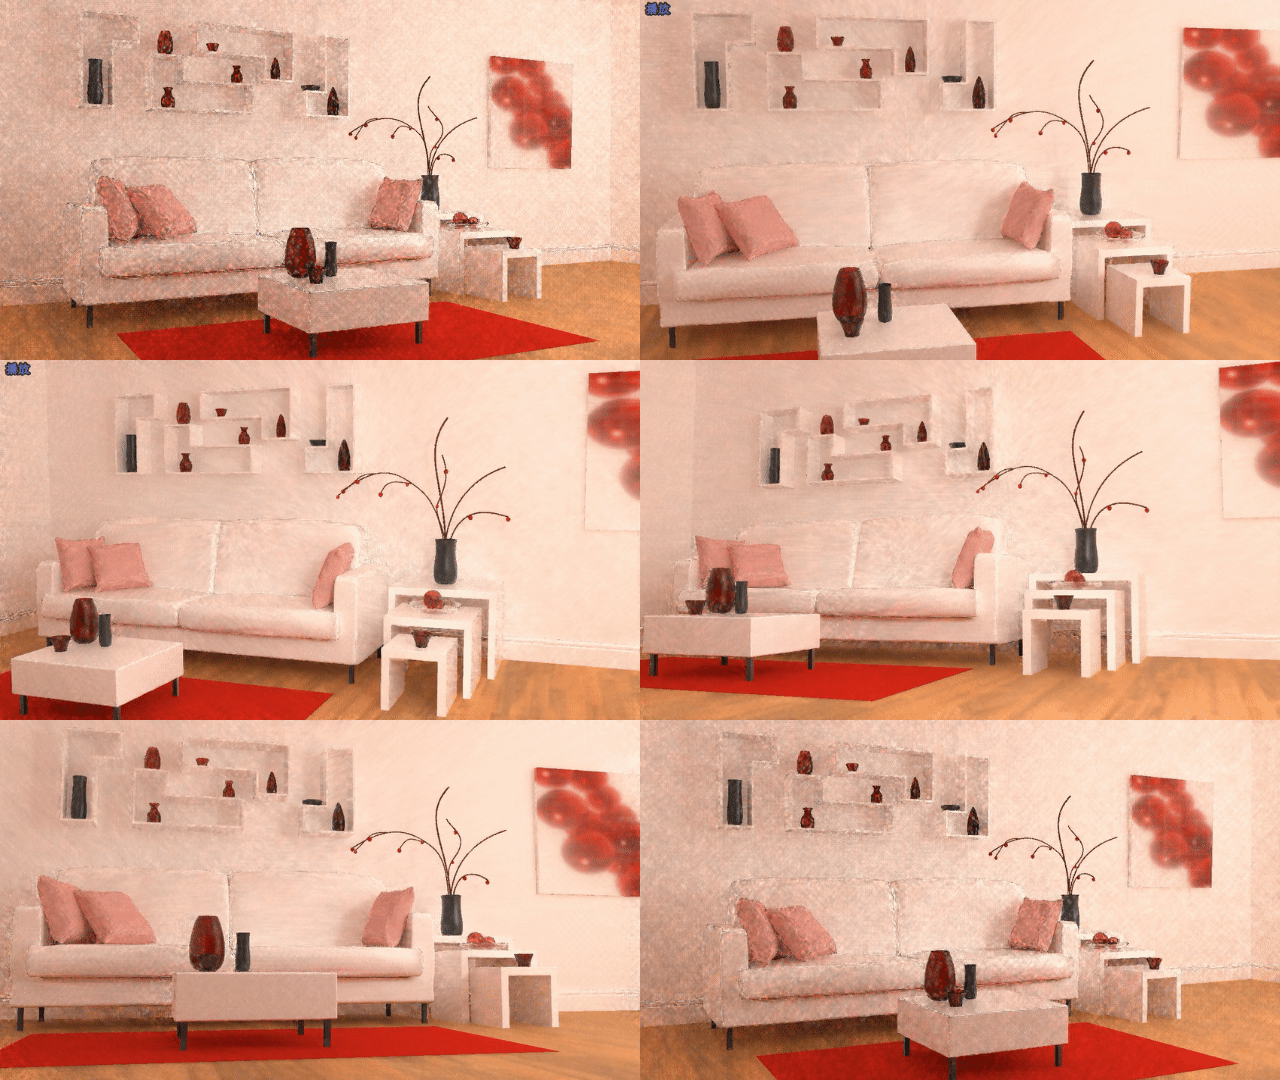
最终效果图
为了降低图片存储空间,只能控制一下FPS以及分辨率了,看起来像ppt别介意👀。
这是降噪前的截图
 Pinkroom-SVGF
Pinkroom-JBF-Atrous
作业要求总览
- 实现单帧降噪。
- 实现两帧间的投影。
- 实现两帧间的累积。
- Bouns 1:实现A-Trous Wavelet加速单帧降噪。
个人扩展部分:Spatiotemporal-Variance-Guided-Filtering
源码
前言
关于作业的构建以及完整运行流程本文不做太多介绍,网上有很多关于该部分内容的教程,重点放在算法本身。
概述
本次作业框架提供了exr文件的读写操作(exr的内容就是1Spp的path
tracing得到的结果),我们需要的数据也通过FrameInfo封装好了,需要完成的地方就是denoiser类的成员函数。
关于读取exr需要的注意的地方就是,width和height记得将其初始化一下,否则exr文件读取错误时,内存会直接撑爆,卡的要死。
1
2
3
4
5
6
7
8
9
10
11
12
13
14
Buffer2D<Float3> ReadFloat3Image(const std::string &filename) {
int width = 0, height = 0;
float *_buffer = ReadImage(filename, width, height, 3);
...
}
float *ReadImage(const std::string &filename, int &width, int &height,
const int &channel) {
...
int ret = LoadEXR(&out, &width, &height, filename.c_str(), &err);
//不初始化,读取失败后width * height得到的值巨大无比。
float *buffer = new float[width * height * channel];
...
}debug部分在这里加上断点,可以让你在调试时候通过堆栈快速定位问题地方。否则报错只有简短的报错信息,压根不知道是哪错了。
1
2
3
4
5
6
template <typename T>
inline T &Buffer2D<T>::operator()(const int &x, const int &y) {
if (!(0 <= x && x < m_width && 0 <= y && y < m_height))
int i = 0;
...
}
实现 JBF A-Trous Wavelet
高斯滤波
先介绍一下高斯滤波在图形学的应用后面会用到
二维高斯函数的定义为:
\[
f(x,y) = \dfrac{1}{2\pi\sigma^{2}}e^{-\dfrac{x^{2}+y^{2}}{2\sigma^{2}}}
\]
x,y :是偏移值,\(r^2 = x^2 +
y^2\)可以看做距离平方
σ :是正态分布的标准偏差,可以决定函数的胖瘦。
在二维空间中,这个公式生成的曲面的等高线是从中心开始呈正态分布的同心圆。分布不为零的像素组成的卷积矩阵与原始图像做变换。每个像素的值都是周围相邻像素值的加权平均。原始像素的值有最大的高斯分布值,所以有最大的权重,相邻像素随着距离原始像素越来越远,其权重也越来越小。
一个3 * 3高斯核的偏移图:
\[
\begin{bmatrix}
-1,1 & 0,1 & 1,1 \\\
-1,0 & 0,0 & 1,0 \\\
-1,-1 & 0,-1 & 1,-1
\end{bmatrix}
\]
假定\(\sigma =
0.8\),根据偏移值和高斯函数可以得到一个3 * 3高斯核:
\[
\begin{bmatrix}
0.05212 & 0.1138 & 0.05212 \\\
0.1138 & 0.2486 & 0.1138 \\\
0.05212 & 0.1138 & 0.05212
\end{bmatrix}
\]
由于高斯核的大小不能无限大,所以该上面生成的高斯核权重加起来大约只有0.91左右。在次之前需要除以左上角的值使最小值为1,然后取整,最后进行归一化处理,使3 * 3的高斯核总权重为1,得到一个类高斯的滤波核。下面是归一化的高斯核:
\[
\begin{bmatrix}
\dfrac{1}{16} & \dfrac{1}{8} & \dfrac{1}{16} \\\
\dfrac{1}{8} & \dfrac{1}{4} & \dfrac{1}{8} \\\
\dfrac{1}{16} & \dfrac{1}{8} & \dfrac{1}{16}
\end{bmatrix}
\]
联合双边滤波
权重总和为1或不为1的滤波器的实现在课上有提到:
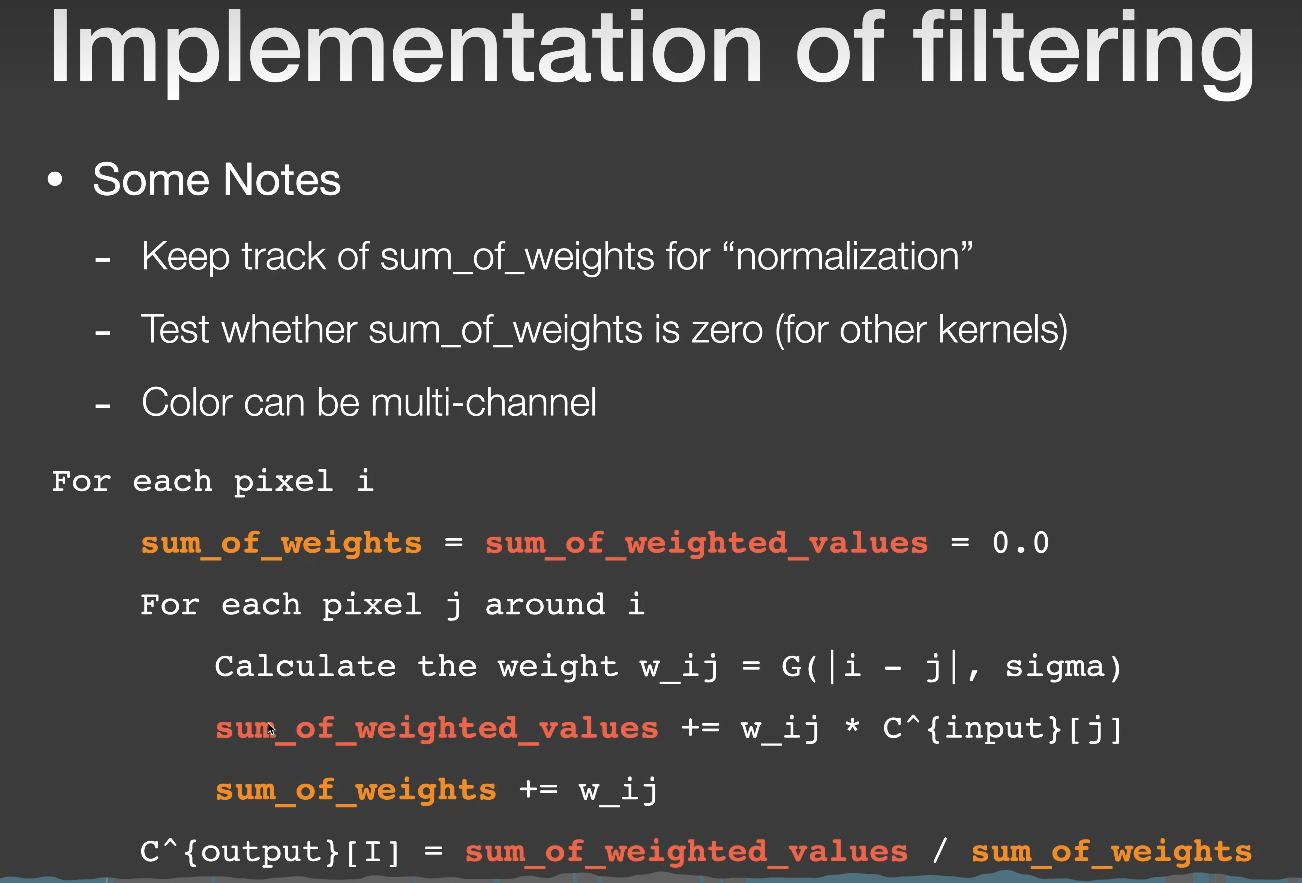
w_ij : 遍历到周围像素时,该像素的权重。
sum_of_weights :
各像素权重总和,如果是上面提到的归一化高斯核,则该值等于1。
sum_of_weighted_values :
各像素值经过权重处理后的总和。
C^{input}[j] :
各像素的值,可以是灰度值或者RGB颜色值。
总的来说,就是每个像素都会考虑它一定范围内像素值对它的贡献,最后再除以权重总和就是该像素的颜色值。这样做优点在于,它不会引起整体能量的降低或升高,不会导致图像整体变暗或变亮。
所以我们不需要再关系滤波核的权重,而是关注滤波核的形状,而图像降噪部分最重要的就是滤波核的形状。
如果只是使用高斯滤波核,则图像的高频信息都会被抹去,保留住了低频信息,这样看起来图像就会变得很模糊:
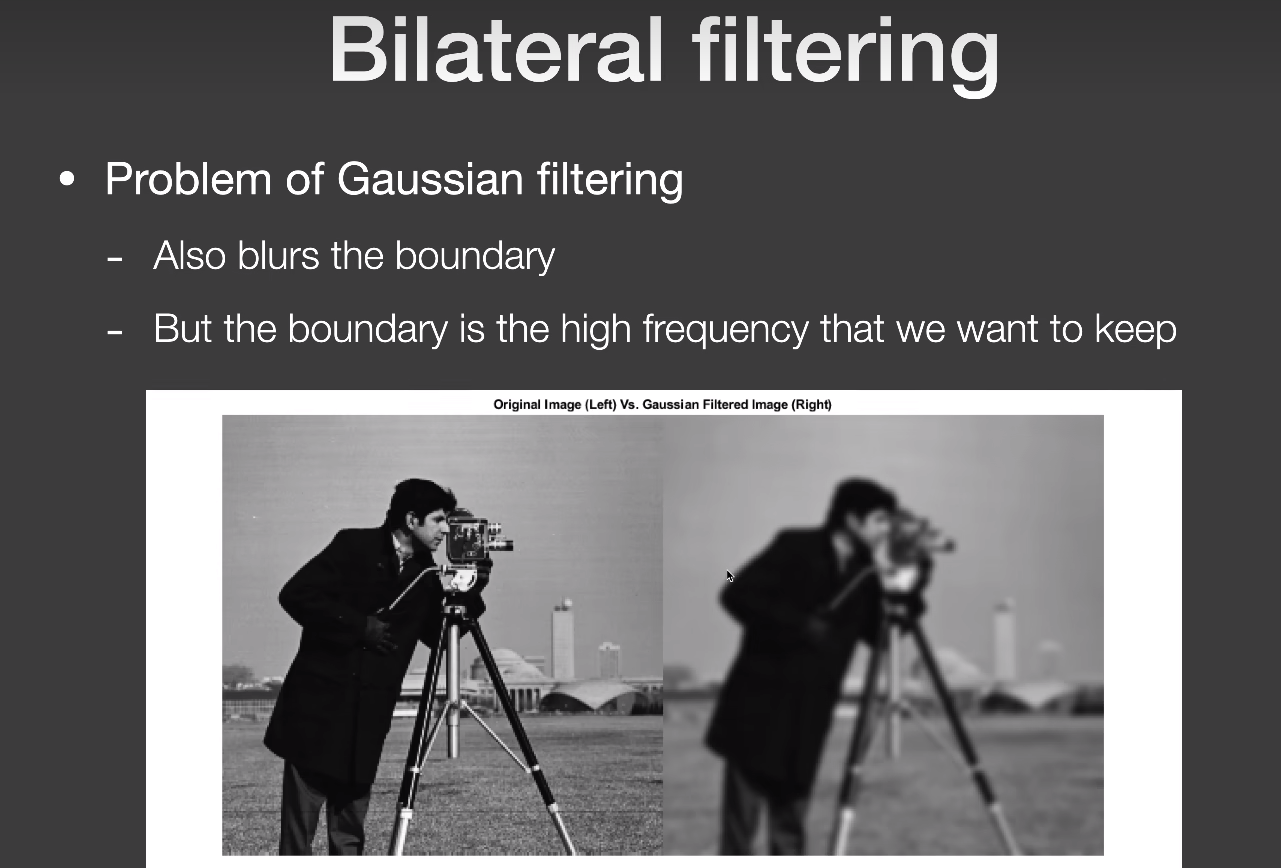 而我们还是希望边界不要被糊掉,以及保留一些有用的高频信息,这就引入了新的方法
BF(Bilateral Filtering):
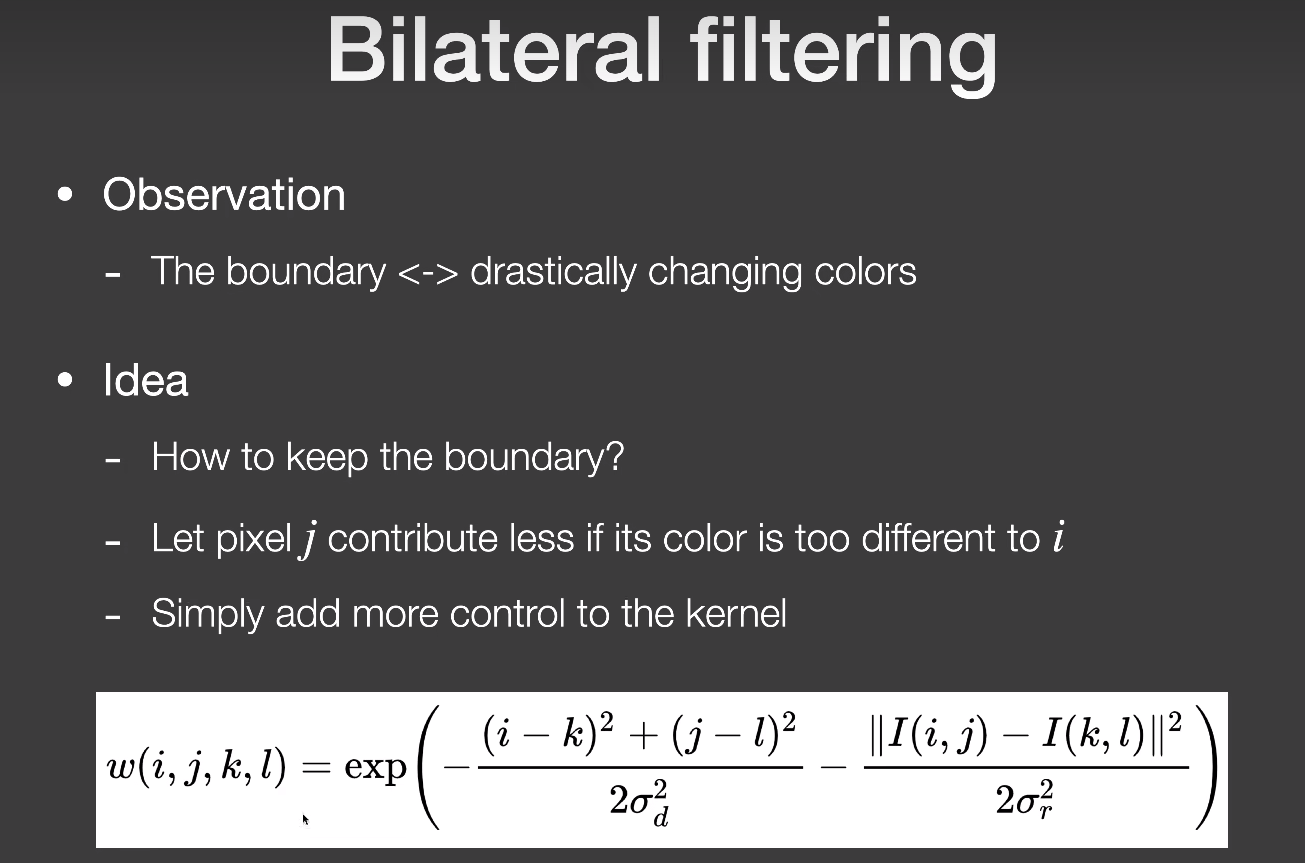
i,j 表示一个点;
k,l 表示另一个点。
该方法在类高斯滤波(一切随距离衰减的函数都可以用,所以前面那一坨就去掉了)上增加了一个颜色贡献项,也就说中心周围的像素和中心像素的颜色差异过大就不给予它贡献,这样边界这种高频信息就不会被糊掉。下面就是该方法的效果:
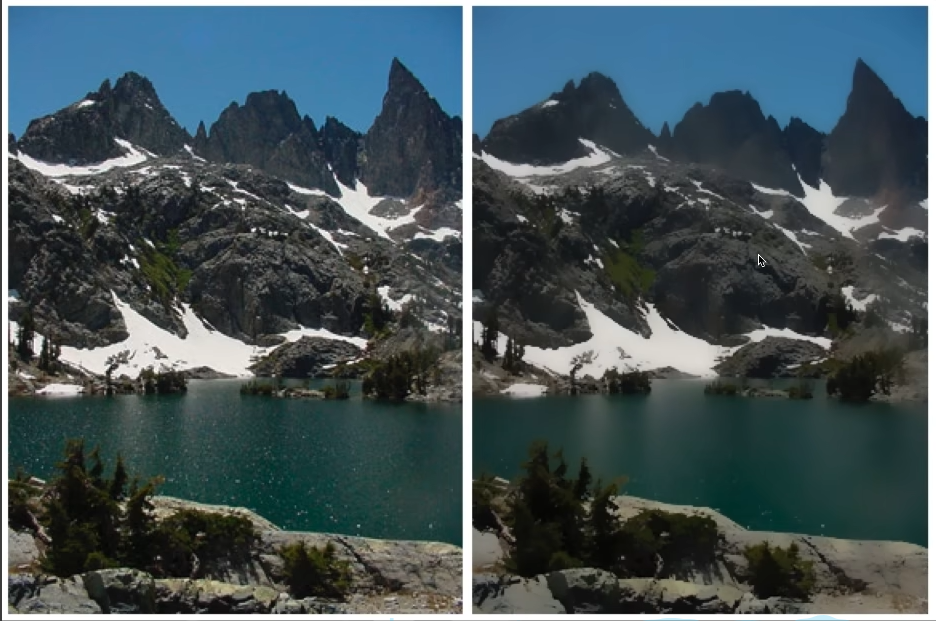 效果是好了很多,边界也很清晰了,但还是有问题,山体以及水面很多有用的高频信息被当做噪声抹掉了,也就是说该方法分不清噪点和有用的高频信息。
所以在此基础上,再增加一些新的判断标准就可以保留更多有用的高频信息,这就是引入了JBF/CBF(Joint/Cross Bilateral Filtering):
\[
J(i,j) = \exp(-\frac{\lVert i-j\lVert ^2}{2\sigma_{p}^2} - \frac{\lVert
\widetilde{C}[i] - \widetilde{C}[j] \lVert ^2 }{2\sigma_{c}^2} -
\frac{D_{normal}(i,j)^2}{2\sigma_{n}^2} -
\frac{D_{plane}(i,j)^2}{2\sigma_{d}^2})
\]
其中i,j 为不同的两个像素点。 \[
D_{normal}(i,j) = arccos(Normal[i] \cdot Normal[j])
\]
\[ D_{plane}(i,j) = Normal[i]\cdot \frac{Position[j] - Position[i]}{\lVert Position[j] - Positon[i] \lVert} \]
\(\widetilde{C}\)为有噪声的输入图像,\(D_{normal}\)为两法线夹角,\(D_{plane}\)为深度差值指标。公式中的各个σ值在Denoiser类中有提供。
该方法新增两个判断标准来源Gbuffer,由于Gbuffer生成的纹理是没有任何噪声的,所以用它们来指导滤波效果非常不错,而且生成Gbuffer的性能消耗几乎可以忽略不计,在第一趟Rasterization生成Primary Ray的时候直接顺带就生成了所需要的Gbuffer。
JBF的代码等到后面讲解A-Trous Wavelet单帧降噪加速时在贴上。
两帧间的投影
这一步主要是找出当前帧的每个像素在上一帧对应是哪个像素,如下图所示:
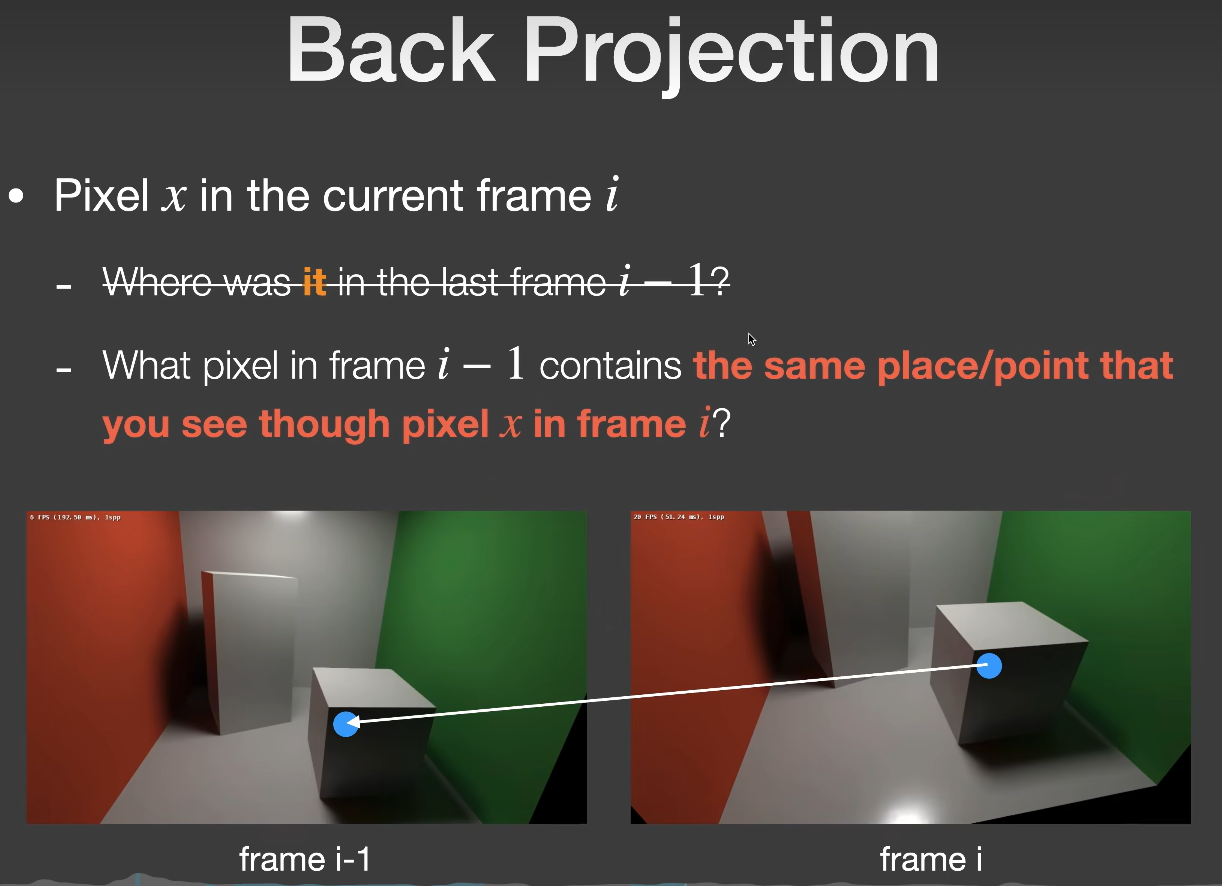 我们称这一过程为
Back Projection,它实现的具体表达式如下:
\[
Screen_{i-1} = E_{i-1}P_{i-1}V_{i-1}M_{i-1}M_{i}^{-1}World_{i}
\] \(E_{i-1}\)
是视口变换,闫老师说公式中漏掉了,这里我补上。
我们可以通过该式子找到当前帧当前片段对应的上一帧的片段,上述式子中所需要的各种数据在框架中都有提供,具体请后面的代码实现。找到的上一帧信息还有可能无法使用,这一现象我们称作为Temporal Failure,如下图所示,有三种情境会导致投影得到的信息无效。
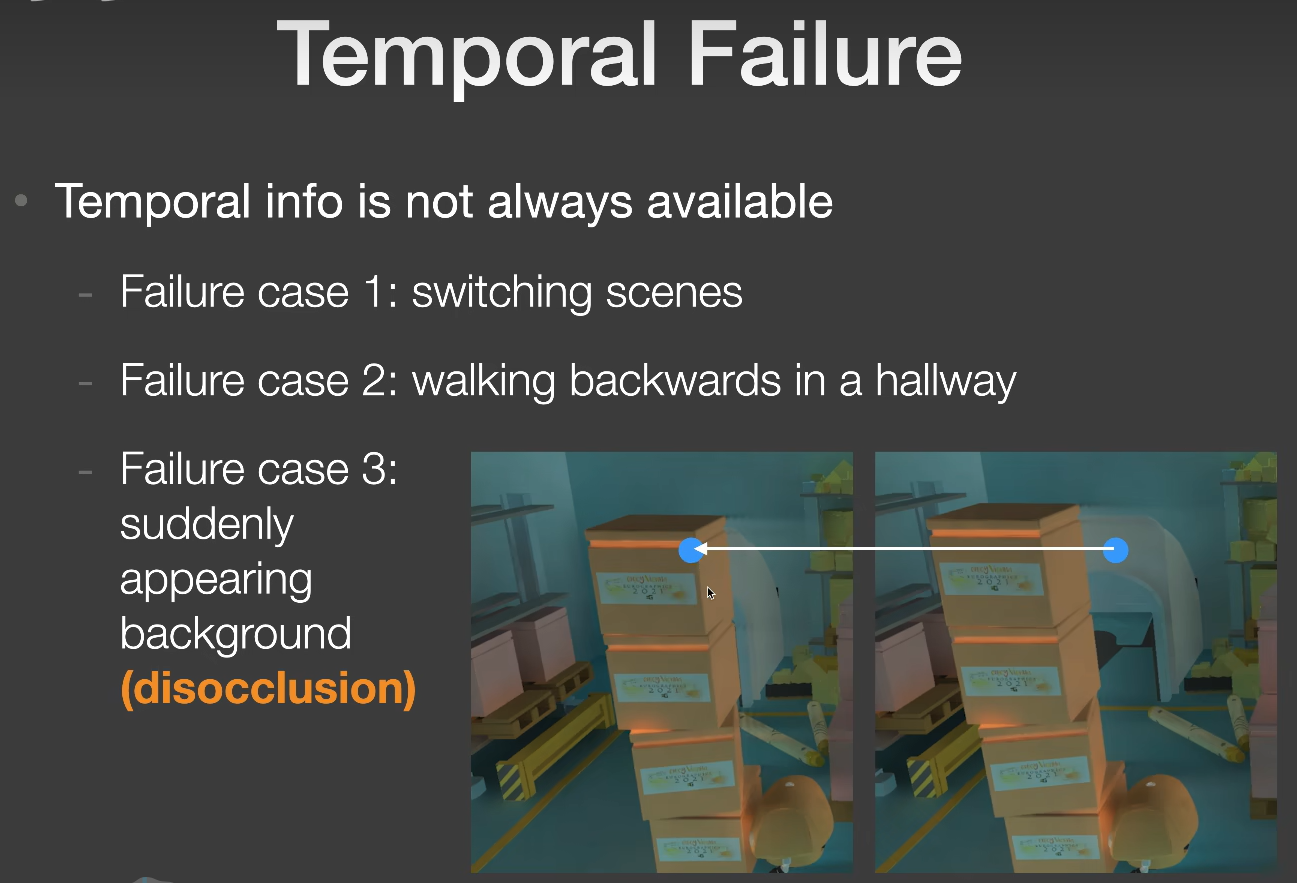 左边的箱子是上一帧,右边的箱子是当前帧。
disocclusion :
当前帧新出现的物体,由被遮挡的状态变成未被遮挡的状态。
前两种情况由屏幕空间的范围来约束它,超出范围的直接丢弃(因为上一帧并未记录屏幕外的信息)。对于第三种,我们则用一个叫Object ID的方法来检测Temporal Failure,如果上一帧和当前帧的Object ID不一致则丢弃,说明当前帧该物体属于disocclusion状态。
代码实现如下:
1
2
3
4
5
6
7
8
9
10
11
12
13
14
15
16
17
18
19
20
21
22
23
24
25
26
27
28
29
30
31
32
33
34
35
36
37
38
39
40
41
42
43
void Denoiser_JBF::Reprojection(const FrameInfo &frameInfo) {
int height = m_accColor.m_height;
int width = m_accColor.m_width;
Matrix4x4 pre_World_To_Screen =
m_preFrameInfo.m_matrix[m_preFrameInfo.m_matrix.size() - 1];
#pragma omp parallel for
for (int y = 0; y < height; y++) {
for (int x = 0; x < width; x++) {
// TODO: Reproject
m_valid(x, y) = false;
m_misc(x, y) = Float3(0.f);
int id = frameInfo.m_id(x, y);
if (id == -1) {
continue;
}
Matrix4x4 world_to_local = Inverse(frameInfo.m_matrix[id]);
Matrix4x4 pre_local_to_world = m_preFrameInfo.m_matrix[id];
auto world_position = frameInfo.m_position(x, y);
auto local_position =
world_to_local(world_position, Float3::EType::Point);
auto pre_world_position =
pre_local_to_world(local_position, Float3::EType::Point);
auto pre_screen_position =
pre_World_To_Screen(pre_world_position, Float3::EType::Point);
if (pre_screen_position.x < 0 || pre_screen_position.x >= width ||
pre_screen_position.y < 0 || pre_screen_position.y >= height) {
continue;
} else {
int pre_id =
m_preFrameInfo.m_id(pre_screen_position.x, pre_screen_position.y);
if (pre_id == id) {
m_valid(x, y) = true;
m_misc(x, y) =
m_accColor(pre_screen_position.x, pre_screen_position.y);
}
}
}
}
//m_misc是一个临时存储的buffer,如果一趟pass中,读写是同一个buffer,就需要另开一个buffer来避免它们相互干扰。在后面svgf中我们也会经常这么使用。
std::swap(m_misc, m_accColor);
}
其中world_to_local对应 \(M_{i}^{-1}\),pre_local_to_world对应
\(M_{i-1}\),pre_World_To_Screen对应
\(E_{i-1}P_{i-1}V_{i-1}\)。
两帧间的累积
上一节中我已经拿到了上一帧有用的历史信息,这一小节则是将当前帧与上一帧进行线性混合,在线性混合之前还需要一次Clamp操作,将上一帧的颜色利用当前帧的均值和方差严格控制在当前帧颜色附近,公式如下:
\[
\overline{C}_{i}=\alpha\overline{C}_{i}+(1-\alpha)Clamp(\overline{C}_{i-1})
\] \(\alpha\)的值通常取0.2。
对于Clamp部分,首先需要计算 \(\overline{C}_{i}\)在7 * 7的邻域内的均值μ和方差σ,然后把上一帧的颜色
\(\overline{C}_{i-1}\)Clamp在
\((\mu - k\sigma, \mu + k
\sigma)\)范围内。
代码实现如下:
1
2
3
4
5
6
7
8
9
10
11
12
13
14
15
16
17
18
19
20
21
22
23
24
25
26
27
28
29
30
31
32
33
34
35
36
37
38
39
40
41
42
43
44
45
void Denoiser_JBF::TemporalAccumulation(const Buffer2D<Float3> &curFilteredColor) {
int height = m_accColor.m_height;
int width = m_accColor.m_width;
int kernelRadius = 3;
#pragma omp parallel for
for (int y = 0; y < height; y++) {
for (int x = 0; x < width; x++) {
// TODO: Temporal clamp
Float3 color = m_accColor(x, y);
//Set Alpha to 1 when no legal corresponding point was found in the previous frame
float alpha = 1.0f;
if (m_valid(x, y)) {
alpha = m_alpha;
int x_start = std::max(0, x - kernelRadius);
int x_end = std::min(width - 1, x + kernelRadius);
int y_start = std::max(0, y - kernelRadius);
int y_end = std::min(height - 1, y + kernelRadius);
Float3 mu(0.f);
Float3 sigma(0.f);
for (int m = x_start; m <= x_end; m++) {
for (int n = y_start; n <= y_end; n++) {
mu += curFilteredColor(m, n);
//sqr:平方
sigma += Sqr(curFilteredColor(x, y) - curFilteredColor(m, n));
}
}
int count = kernelRadius * 2 + 1;
// 7 * 7
count *= count;
mu /= float(count);
sigma = SafeSqrt(sigma / float(count));
color = Clamp(color, mu - sigma * m_colorBoxK, mu + sigma * m_colorBoxK);
}
m_misc(x, y) = Lerp(color, curFilteredColor(x, y), alpha);
}
}
std::swap(m_misc, m_accColor);
}Clamp是为了减轻Lagging(拖影)现象,如果什么都不做强行使用上一帧的信息,就会导致拖影现象:
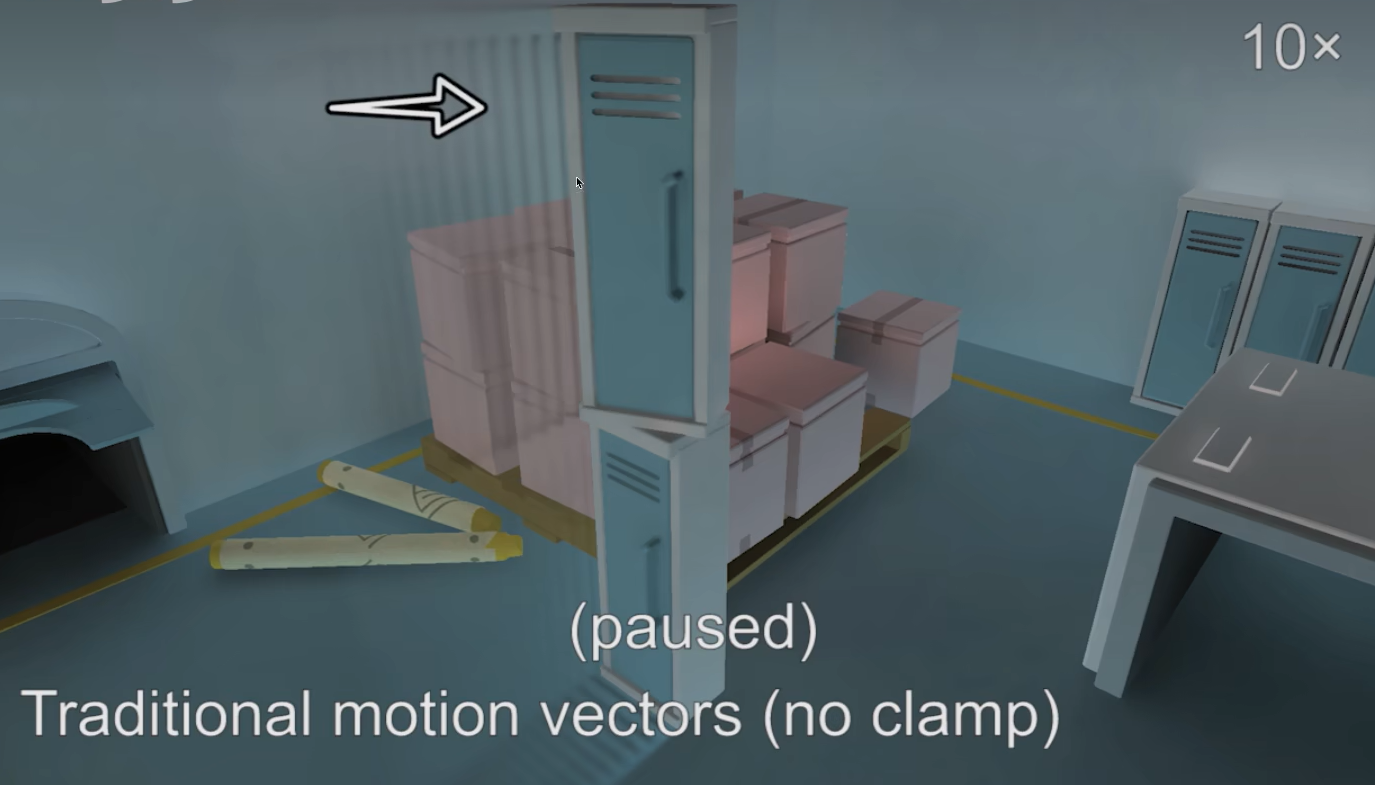
使用了Clamp方法后,拖影现象没了,但是会重新引入噪声,不过相比于拖影效果还是好了很多:

通常Object ID和Clamp方法是一起使用。
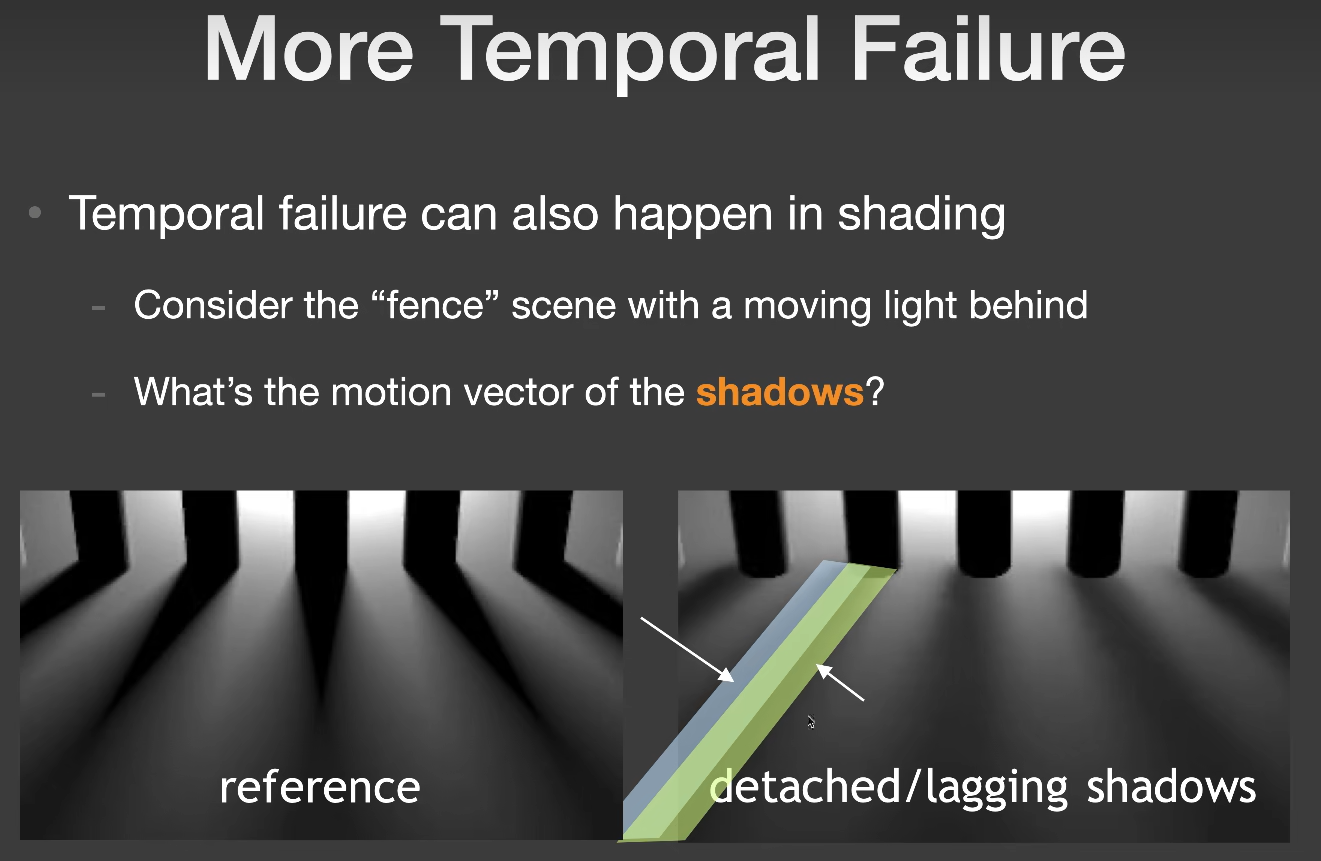
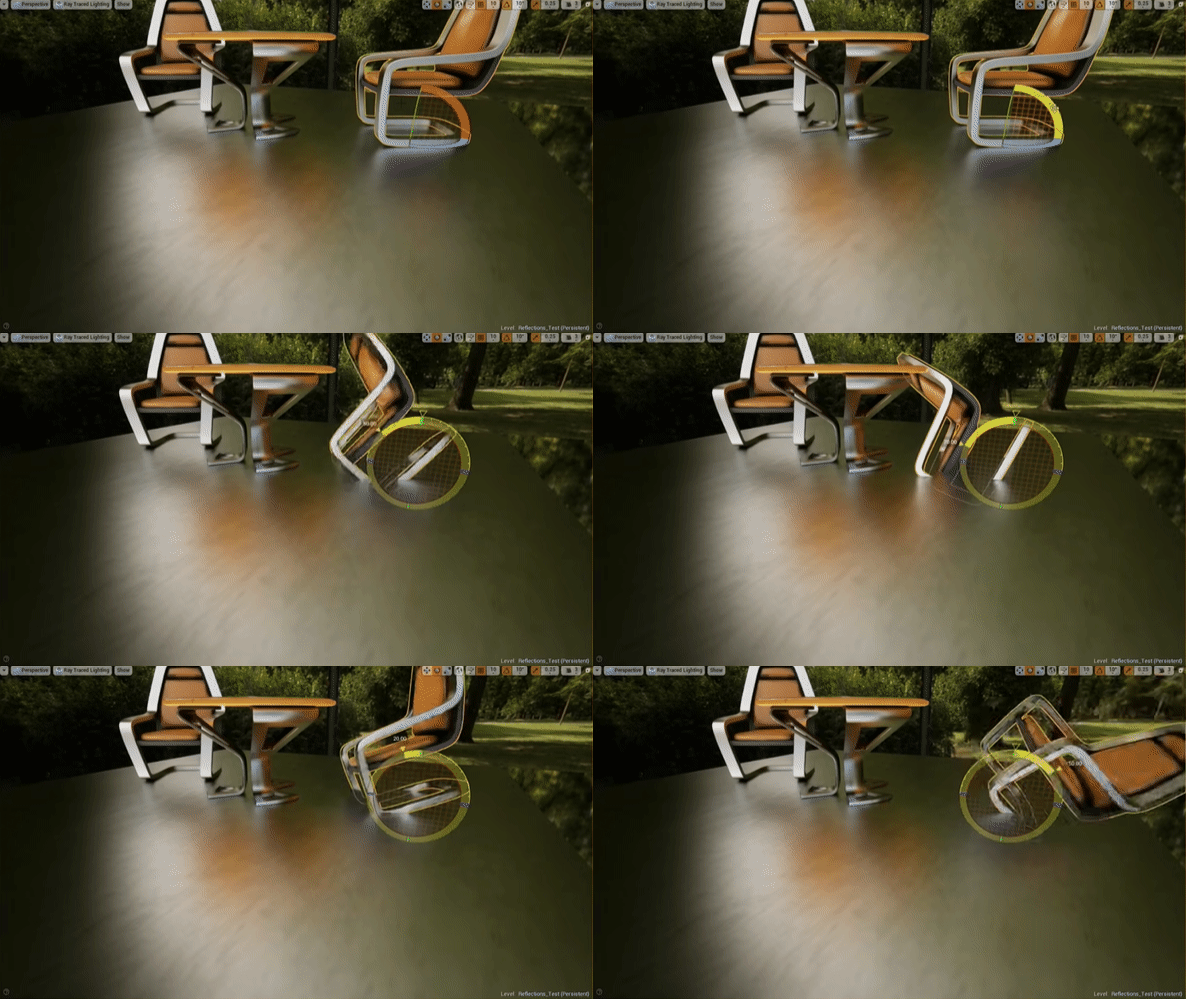
即使我们已经做得足够好了,但还是有很多的Temporal Failure,并不是因为几何的原因,而是shading过程中也会出问题,也就是说阴影或者反射这种现象,在用上一帧的信息时,它的motion vector是零,当前帧当前片段就会用上一帧的信息,这就会导致阴影拖尾或者反射延迟的现象:
Detached/Lagging shadows
 Reflection
hysteresis
加速单帧降噪
Separate Passes
在此之前还介绍一种Separate Passes的方法,该方法可以将复杂度从N^2降到2N:
 该方法很适合高斯滤波,因为高斯滤波在定义上就可以拆分成两个方向上函数的乘积形式,滤波过程中相当于先水平方向做一次卷积,然后将结果给到竖直方向再做一次卷积,非常完美:
 但问题是
但问题是BF和JBF的卷积核,不是一个高斯函数,想要将它拆分成水平竖直的函数是几乎不可能,但这里是实时渲染,“约等于”无处不在😆,filter的范围只要不是太大比如32 * 32还是可以勉强用一用的。
A-Trous Wavelet
上面提到的Separate Passes方法,我还没看到在哪里用上了😅。而A-Trous Wavelet方法在降噪这方面几乎是通吃,应用非常广泛:
 这里
这里ppt上的图片不太好理解,我这里引用一下知乎花桑的图片

A-Trous Wavelet方法相当于吧一个非常大范围的filter过程分解成几趟pass来完成,我们需要filter的点位p就是const Float3 p = ipos + Float3(xx, yy,0) * stepSize;其中ipos中心点,xx,yy是偏移值,stepSize则是
\(2^{pass-1}\)
这样3趟5 * 5的滤波就相当于16 * 16的滤波。在实际应用中,我们通常使用一个大小为5 * 5的滤波核,走5趟,来模拟64 * 64的滤波过程。(5
* 5的滤波核,走5趟,filter半径即 \(2 \times
2^{5-1}=32\))
当然这只是该方法的应用,它的原理其实很复杂,简单概述一下:
 对于第一个问题:
为什么要用一个逐渐增加的filter范围,不能一上来就是最大范围?
图上给出的答案是,逐渐增加的filter范围 ==
去掉更低的频率。
对于第一趟pass,我们filter的过程是将高频信息限制在一个可接受的范围内,往后的每一趟pass都是在前一趟的基础上继续将高频信息限制在一个更低的可接受范围内,所以这里“去掉更低的频率”意思是相比于上一趟pass,去掉比上一趟高频信息更低一点的高频信息。自然这个过程就是filter的范围是逐渐增加,而不能一上来就是filter最大的范围。
对于第二个问题:
为什么可以安全的跳过一些采样点?
图上给出的答案是,采样 == 重复搬移频谱。
首先对于采样来说,时域上的采样等于原始函数乘上冲击函数。而对应频域上,就是原始频谱卷积冲击频谱,相当于对在频域上对原始频谱进行搬移的操作,而且时域冲击函数的冲击间隔越大,对应频域搬移的间隔就越小:

(a)为原始函数,(b)为该函数经过傅里叶变化后的频谱。
(c)为冲击函数,(d)为该函数经过傅里叶变化后的频谱。
(e)为原始函数乘上冲击函数的结果。
(f)为(b)(d)频谱卷积后的结果。
我们知道如果时域采样间隔增加大,频域上频谱混叠就越严重,只有当频谱中高频信息被抹掉后,混叠才不会引起走样。这也是要用一个逐渐增加的filter范围的一个原因。
 回到问题上,
A-Trous Wavelet的采样间隔为\(2^{pass-1}-1\),这种采样间距的好处是搬移的边界正好是上一趟留下的最高频率。
所以这种采样可以安全的跳过一些采样点,而不引入走样。
结合第一个问题和第二个问题,当前pass会除去一些更低的高频信息,有助于搬移混叠时减少走样现象,以\(2^{pass-1}-1\)的间隔去采样,由于搬移时左右边界都是上一次留下的最高频信息,所以这种逐渐增大的采样间隔并不会新增走样。
更多内容请关注该论文:
Edge-Avoiding
À-Trous Wavelet Transform for fast Global Illumination Filtering
JBF A-Trous Wavelet的代码实现如下:
1
2
3
4
5
6
7
8
9
10
11
12
13
14
15
16
17
18
19
20
21
22
23
24
25
26
27
28
29
30
31
32
33
34
35
36
37
38
39
40
41
42
43
44
45
46
47
48
49
50
51
52
53
54
55
56
57
58
59
60
Buffer2D<Float3> Denoiser_JBF::ATrousWaveletFilter(const FrameInfo &frameInfo) {
int height = frameInfo.m_beauty.m_height;
int width = frameInfo.m_beauty.m_width;
Buffer2D<Float3> filteredImage = CreateBuffer2D<Float3>(width, height);
#pragma omp parallel for
for (int y = 0; y < height; y++) {
for (int x = 0; x < width; x++) {
// TODO: Joint bilateral filter
// filteredImage(x, y) = frameInfo.m_beauty(x, y);
auto center_postion = frameInfo.m_position(x, y);
auto center_normal = frameInfo.m_normal(x, y);
auto center_color = frameInfo.m_beauty(x, y);
Float3 final_color;
auto total_weight = .0f;
int passes = 5;
for (int pass = 0; pass < passes; pass++) {
for (int filterX = -2; filterX <= 2; filterX++) {
for (int filterY = -2; filterY <= 2; filterY++) {
int m = x + std::pow(2, pass) * filterX;
int n = y + std::pow(2, pass) * filterY;
auto postion = frameInfo.m_position(m, n);
auto normal = frameInfo.m_normal(m, n);
auto color = frameInfo.m_beauty(m, n);
auto d_position = SqrDistance(center_postion, postion) /
(2.0f * m_sigmaCoord * m_sigmaCoord);
auto d_color = SqrDistance(center_color, color) /
(2.0f * m_sigmaColor * m_sigmaColor);
auto d_normal = SafeAcos(Dot(center_normal, normal));
d_normal *= d_normal;
d_normal /= (2.0f * m_sigmaNormal * m_sigmaNormal);
float d_plane = .0f;
if (d_position > 0.f) {
d_plane = Dot(center_normal, Normalize(postion - center_postion));
}
d_plane *= d_plane;
d_plane /= (2.0f * m_sigmaPlane * m_sigmaPlane);
float weight =
std::exp(-d_plane - d_position - d_color - d_normal);
total_weight += weight;
final_color += color * weight;
}
}
}
if (total_weight == 0)
filteredImage(x, y) = center_color;
else
filteredImage(x, y) = final_color / total_weight;
}
}
return filteredImage;
}
用该方法filter的效果图:
此时的sigmaColor为0.6f
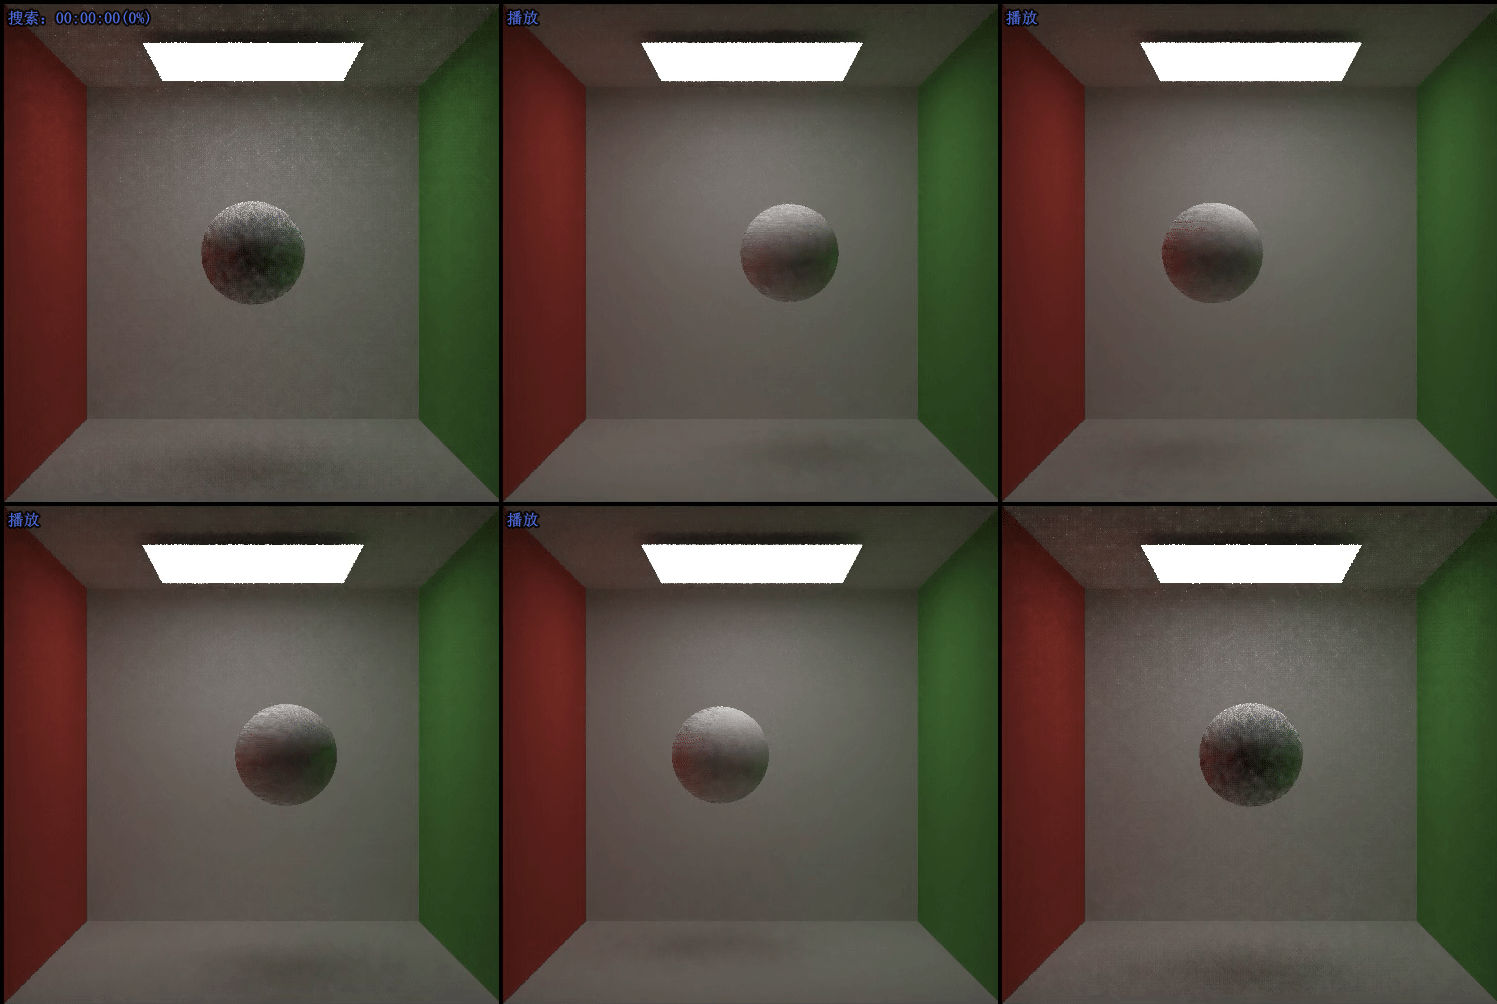
而Pink Room的sigmaColor需要调为10.0f,否则完全不能看。

实现 SVGF
论文地址以及论文提供的源码地址
Paper : Spatiotemporal-Variance-Guided-Filtering
Source Code : Falcor
本文部分代码以及图片均来源于此。
算法概述
SVGF资料不多,我引用一下论文中的图片来讲解:

首先从路径追踪得到直接光和间接光每个像素的颜色,然后通过除以像素上的纹理信息(Demodulate
Albedo)得到像素的Irradiance(辐照度):
1
2
3
4
5
float3 demodulate(float3 c, float3 albedo){
return c / max(albedo, float3(0.001, 0.001, 0.001));
}
float3 illumination = demodulate(gColor[ipos].rgb - gEmission[ipos].rgb, gAlbedo[ipos].rgb);Irradiance信息进行时间和空间上的混合Filter来重建因为样本极度稀疏所丢失的信息(Reconstruction
Filter)。对Irradiance进行Filter之后,再把纹理信息叠加回来(Modulate
Albedo):
1
2
3
4
5
6
float4 main(FullScreenPassVsOut vsOut) : SV_TARGET0
{
const int2 ipos = int2(vsOut.posH.xy);
return gAlbedo[ipos] * gIllumination[ipos] + gEmission[ipos];
}Filter的强度过于大而丢失掉。在Pipeline的最后,采用现在引擎里非常流行的Temporal AA,更进一步的消除画面上残留的抖动,保证结果序列帧间的稳定。
由于作业5,提供的EXR文件中只包含了直接光和间接光结合在一起的完整结果,我在进行Reconstruction Filter过程中也是直接对该结果进行的Filter,所以画面有些地方会糊掉会很正常。
至于Tone Mapping和TAA我均未实现,我们的重点是Reconstruction Filter。
Reconstruction Filter

重建执行三个主要步骤:在时间上累积我们的1 spp路径跟踪输入以提高有效采样率,使用这些时间上增强的颜色样本来估计局部亮度方差,以及使用这些方差估计来驱动分层的“a-trous小波滤波器”。
Temporal Filtering
Temporal Filter和上文提到的“两帧间的累积”很相似,公式如下:
\[
C_{i} = \alpha C_{i} + (1-\alpha)C_{i-1}
\]
为了尽可能多的囊括历史帧里的样本信息,Temporal Filter并不像JBF那样通过Color Clamping来防止Ghosting这种问题。所以在做Sample Reprojection的时候需要检查范围,深度,法线,模型索引等,去尽可能的丢弃无效的历史样本:
1
2
3
4
5
6
7
8
9
10
11
12
13
14
15
16
17
18
19
20
if (loc.x < 0 || loc.x >= width || loc.y < 0 || loc.y >= height)
//丢弃
bool Denoiser_SVGF::isReprjValid(
const float depth,const float preDepth,const float fwidthZ,
const Float3 normal, const Float3 preNormal,const float fwidthNormal,
const int meshId,const int preMeshId
) {
// check if deviation of depths is acceptable
if (std::fabs(depth - preDepth) / (fwidthZ + 1e-2) > 10.0f)
return false;
// check normals for compatibility
if (Distance(normal, preNormal) / (fwidthNormal + 1e-2) > 16.0)
return false;
// Since the grayscale is the result of direct path-tracing, there is a mutual contribution that can occur without meshid.
//To mitigate this, add meshid, which can cause other problems such as artifacts.
if (meshId != preMeshId)
return false;
return true;
}fwidthZ,fwidthNormal为深度或法线在x,y方向上的偏导和。其计算方法如下:
1
2
3
4
5
6
7
8
const Float3 normal = frameInfo.m_normal(x, y);
const float ddxN = Distance(frameInfo.m_normal(x + 1, y), normal);
const float ddyN = Distance(frameInfo.m_normal(x, y + 1), normal);
const float fwidthNormal = ddxN + ddyN;
const float depth = frameInfo.m_depth(x, y);
const float ddxZ = std::fabs(frameInfo.m_depth(x + 1, y) - depth);
const float ddyZ = std::fabs(frameInfo.m_depth(x, y + 1) - depth);
const float fwidthZ = ddxZ + ddyZ;Temporal Filter公式中的\(\alpha\)是根据寻找历史样本的成功次数来定的,最大为1,最小自定:
1
2
3
4
5
6
7
8
9
10
11
12
13
14
15
16
17
18
19
// this adjusts the alpha for the case where insufficient history is available.
// It boosts the temporal accumulation to give the samples equal weights in the beginning.
const float alpha = success ? std::fmax(m_Alpha, 1.0 / historyLength) : 1.0;
const float alphaMoments = success ? std::fmax(m_MomentsAlpha, 1.0 / historyLength) : 1.0;
// compute first two moments of luminance
Float3 moments;
moments.x = Luminance(illumination);
moments.y = moments.x * moments.x;
// temporal integration of the moments
moments = Lerp(prevMoments, moments, alphaMoments);
float variance = std::fmax(0.f, moments.y - moments.x * moments.x);
// temporal integration of illumination
m_accColor(x, y) = Lerp(prevIllumination, illumination, alpha);
m_curFrameVariance(x,y) = variance;
m_moments(x, y) = moments;
m_tmpHisLength(x,y) = historyLength;Temporal Filter,Moments也需要,方差的计算依赖它,通过在时间上积累Luminance的First和Second Moment,\(\mu^{\prime}_{1i}\)和\(\mu^{\prime}_{2i}\),方差的计算公式如下:
\[
\sigma^{\prime 2}_{i}=\mu^{\prime}_{2i}-\mu^{\prime 2}_{1i}
\]
Moments Temporal Filter对应上图中紫色块的处理过程。
Variance Estimation
由于摄像机运动、影视效果和视口变换出界都会导致disocclusion事件,从而影响方差估计的质量。所以我们要对出现disocclusion事件的前4帧进行空间上的7 * 7双边滤波,该滤波核权重由深度,法线,灰度值决定。在此期间也对illumination做一次Filter,两者是同时进行,几乎没有额外开销。代码实现如下:
1
2
3
4
5
6
7
8
9
10
11
12
13
14
15
16
17
18
19
20
21
22
23
24
25
26
27
28
29
30
31
32
33
34
35
36
37
38
39
40
41
42
43
44
45
46
47
48
49
50
51
52
53
54
55
56
57
58
59
60
61
62
63
64
65
66
67
68
69
70
71
72
73
74
75
76
77
void Denoiser_SVGF::VarianceEstimation(const FrameInfo &frameInfo) {
const int height = frameInfo.m_beauty.m_height;
const int width = frameInfo.m_beauty.m_width;
const int radius = 3;
#pragma omp parallel for
for (int y = 0; y < height; y++) {
for (int x = 0; x < width; x++) {
const Float3 ipos = Float3(x, y, 0);
float h = m_historyLength(ipos.x, ipos.y);
if (h < 4.0){// not enough temporal history available
float sumWIllumination = 0.0;
Float3 sumIllumination = Float3(0, 0, 0);
Float3 sumMoments = Float3(0, 0, 0);
const Float3 illuminationCenter = m_accColor(ipos.x, ipos.y);
const float lIlluminationCenter = Luminance(illuminationCenter);
const Float3 nCenter = frameInfo.m_normal(ipos.x, ipos.y);
const float zCenter = frameInfo.m_depth(ipos.x, ipos.y);
// depth-gradient estimation from screen-space derivatives
float dgrad_x = std::fmax(1e-8, std::fabs(frameInfo.m_depth(ipos.x + 1, ipos.y) - zCenter)) * 3.0;
float dgrad_y = std::fmax(1e-8, std::fabs(frameInfo.m_depth(ipos.x, ipos.y + 1) - zCenter)) * 3.0;
float maxDgrad = std::fmax(dgrad_x, dgrad_y);
// compute first and second moment spatially. This code also applies cross-bilateral
// filtering on the input illumination.
for (int yy = -radius; yy <= radius; yy++) {
for (int xx = -radius; xx <= radius; xx++) {
const Float3 p = ipos + Float3(xx, yy,0);
bool inside = false;
if (p.x >= 0 && p.y >= 0 && p.x < width && p.y < height)
inside = true;
if (inside) {
const Float3 illuminationP = m_accColor(p.x, p.y);
const Float3 momentsP = m_moments(p.x, p.y);
const float lIlluminationP = Luminance(illuminationP);
const float zP = frameInfo.m_depth(p.x, p.y);
const Float3 nP = frameInfo.m_normal(p.x,p.y);
// calculate the normal, depth and luminance weights
float nw = normalWeight(nCenter, nP);
float dw = depthWeight(zCenter, zP, maxDgrad,xx, yy);
float lw = luminanceWeight(lIlluminationCenter,
lIlluminationP, 1.0);
float w = nw * dw * lw;
sumWIllumination += w;
sumIllumination += illuminationP * w;
sumMoments += momentsP * w;
}
}
}
// Clamp sum to >0 to avoid NaNs.
sumWIllumination = std::fmax(sumWIllumination, 1e-6f);
sumIllumination /= sumWIllumination;
sumMoments /= sumWIllumination;
// compute variance using the first and second moments
float variance = sumMoments.y - sumMoments.x * sumMoments.x;
// give the variance a boost for the first frames
if (h != 0)
variance *= 4.0 / h;
m_tmpColor(ipos.x, ipos.y) = sumIllumination;
m_curFrameVariance(ipos.x, ipos.y) = variance;
} else {
// do nothing
m_tmpColor(ipos.x, ipos.y) = m_accColor(ipos.x, ipos.y);
}
}
}
std::swap(m_tmpColor, m_accColor);
}disocclusion事件的前几帧进行空间上的方差估计,直到时间累积收集了足够的数据来进行稳定的估计。权重计算函数在下一节讲。
Edge-Stopping Functions
Depth
真实的场景在几何尺度上有很大的变化,尤其是在开阔的景观中。使得全局边缘停止函数不受控制。因此,我们对表面深度设定了一个局部线性模型,并且测量其表面深度的偏差。我们使用剪切空间深度(只要是线性深度即可,本文使用的深度信息应该属于view
space)的屏幕空间偏导数来估计局部深度模型。该权重函数为:
\[
w_{z}=exp(-\dfrac{\left| z(p)-z(q) \right|}{\sigma_{z} \left| \nabla
z(p) \cdot (p-q) \right|+\epsilon})
\]
根据经验\(\sigma_{z}\)为1.0可以得到比较好的效果,用来控制深度的影响是大还是小。
\(\nabla
z\)是屏幕坐标下深度的梯度,\(\epsilon\)是防止除以零。代码实现如下:
1
2
3
4
5
6
7
float Denoiser_SVGF::depthWeight(const float center_depth, const float depth,
const float dgrad,
const float offset_x, const float offset_y) {
const float eps = 1e-8;
Float3 offset{offset_x, offset_y,0};
return std::exp( (-std::fabs(center_depth - depth)) / (std::fabs( m_phiDepth * dgrad * Length(offset)+ eps)) );
}
Normal
法线权重比较简单,法线夹角小权重大,反之权重小。公式如下:
\[
w_{n}=max(0,n(p)\cdot n(q))^{\sigma_{n}}
\] \(\sigma_{n}\)按经验来说为128效果比较好,用来控制法线的权重。
代码实现如下:
1
2
3
float Denoiser_SVGF::normalWeight(const Float3 ¢er_normal, const Float3 &normal) {
return std::pow(std::fmax(0.0, Dot(center_normal, normal)), m_phiNormal);
}
Luminance
亮度边缘停止函数的一个关键方面是它能够通过其局部标准差重新归一化亮度,来自动适应所有亮度。但是,在低样本数下操作会在我们对方差和标准差的估计中引入不稳定性;这可能会引入走样现象。为了避免这些问题,我们使用3 * 3高斯核对方差图像进行预滤波,这显著提高了重建质量。亮度边缘停止函数变为:
\[
w_{l}=exp(-\dfrac{|l_{i}(p)-l_{i}(q)|}{\sigma_{l}\sqrt{g_{3\times3}(Var(l_{i}(p)))}+\epsilon})
\] 根据经验\(\sigma_{l}\)为4效果比较好,用于控制亮度的影响。
由于亮度方差往往会随着后续迭代而减少,因此\(w_{l}\)的影响会随着每次迭代而增加,从而防止过度模糊。
需要注意的是,这个高斯预滤波器仅用于驱动亮度边缘停止函数,而不用于传播到小波变换下的一次迭代的方差中。
代码实现如下:
1
2
3
4
5
6
7
8
9
10
11
12
13
14
15
16
17
18
19
20
21
22
23
24
25
26
27
28
29
float Denoiser_SVGF::computeVarianceCenter(const Float3& ipos,const int width,const int height) {
    float sum = 0.f;

    const float kernel[2][2] = {{1.0 / 4.0, 1.0 / 8.0}, {1.0 / 8.0, 1.0 / 16.0}};

    const int radius = 1;
    for (int yy = -radius; yy <= radius; yy++) {
        for (int xx = -radius; xx <= radius; xx++) {
            Float3 p = ipos + Float3(xx, yy,0);
            p.x = std::fmin(std::fmax(p.x, 0.0), width - 1.0);
            p.y = std::fmin(std::fmax(p.y, 0.0), height - 1.0);
            const float k = kernel[std::abs(xx)][std::abs(yy)];
            sum += m_curFrameVariance(p.x,p.y) * k;
        }
    }

    return sum;
}

const float variance = computeVarianceCenter(ipos,width,height);

float Denoiser_SVGF::luminanceWeight(const float center_lum, const float lum,
                                     const float variance
) {
    const float eps = 1e-10;
    return std::exp( (-std::fabs(center_lum - lum)) /
               (m_phiColor * std::sqrt(std::fmax(0.0, variance) + eps)));
}kernel是 \(\sigma\)为0.8的高斯滤波核,上文有提到。
Edge-avoiding A-trous wavelet transform
Reconstruction Filter的最后最重要的一步,Reproject(Temporal
Filtering)以及Variance Estimation都是为了这一步做铺垫。上文说到光栅化的G-buffer不包含随机噪声,使我们能够使用G-buffer来定义边缘停止函数,这些函数可以用来鉴别像素是否在同一表面,从而进行相互贡献。该论文的实现也使用了A-trous wavelet方法(上文有提及),权重函数
\(w(p,q)\)使用的是一个5 * 5的联合双边滤波核。公式如下:
\[
\hat{c}_{i+1}(p)=\dfrac{\sum_{q\in\Omega}h(q)\cdot
w(p,q)\cdot\hat{c}_{i}(q)}{\sum_{q\in\Omega}h(q)\cdot w(p,q)}
\]
\(h(q)\)是一个类高斯滤波核,论文和本此实现使用的
\(h(q)\)权重系数不太一样不过没关系,都是随距离衰减的函数就行。
\(\Omega\)是滤波器中被收集的像素集合(就是每一趟中踩到的像素点的集合)
\(\hat{c}_{i+1}(p)\)和 \(\hat{c}_{i}(q)\)则是滤波后的输出颜色以及p点附近q点的像素颜色。
该论文新颖的权重函数 \(w(p,q)\)使用的是深度、世界空间法线以及Filter后输入的Luminance,公式如下:
\[
w_{i}(p,q)=w_{z}\cdot w_{n}\cdot w_{l}
\] 这几个函数在上一节我已经详细解释了。
在应用A-trous wavelet过程中,我们会基于亮度方差的局部估计来调整亮度边缘停止函数。然后根据A-trous wavelet来Filter时间上累计的颜色,并假设我们采样到的方差样本是不相关的(相互独立),则我们向下一次A-trous wavelet传递方差的公式为:
\[
Var(\hat{c}_{i+1}(p))=\dfrac{\sum_{q\in\Omega}h(q)^{2}\cdot
w(p,q)^{2}\cdot Var(\hat{c}_{i}(q))}{(\sum_{q\in\Omega}h(q)\cdot
w(p,q))^{2}}
\]
我们会使用这个结果来控制下一次A-trous wavelet的边缘停止函数。
代码实现如下:
1
2
3
4
5
6
7
8
9
10
11
12
13
14
15
16
17
18
19
20
21
22
23
24
25
26
27
28
29
30
31
32
33
34
35
36
37
38
39
40
41
42
43
44
45
46
47
48
49
50
51
52
53
54
55
56
57
58
59
60
61
62
63
64
65
66
67
68
69
70
71
72
void Denoiser_SVGF::ATrousWaveletFilter(const FrameInfo &frameInfo,const int stepSize) {
const int height = frameInfo.m_beauty.m_height;
const int width = frameInfo.m_beauty.m_width;
const float kernelWeights[3] = {1.0, 2.0 / 3.0, 1.0 / 6.0};
#pragma omp parallel for
for (int y = 0; y < height; y++) {
for (int x = 0; x < width; x++) {
// TODO: SVGF
const Float3 ipos = Float3(x, y, 0);
const Float3 illuminationCenter = m_accColor(ipos.x, ipos.y);
const float lIlluminationCenter = Luminance(illuminationCenter);
//variance,filtered using 3 * 3 gaussin blur
const float var = computeVarianceCenter(ipos,width,height);
const float zCenter = frameInfo.m_depth(ipos.x, ipos.y);
const Float3 nCenter = frameInfo.m_normal(ipos.x, ipos.y);
float dgrad_x = std::fmax(1e-8, std::fabs(frameInfo.m_depth(ipos.x + 1, ipos.y) - zCenter)) * stepSize;
float dgrad_y = std::fmax(1e-8, std::fabs(frameInfo.m_depth(ipos.x, ipos.y + 1) - zCenter)) * stepSize;
float maxDgrad = std::fmax(dgrad_x, dgrad_y);
//explicitly store/accumulate center pixel with weight 1 to prevent issues
//with the edge-stopping functions
float sumWIllumination = 1.0;
float sumVariance = m_curFrameVariance(ipos.x, ipos.y);
Float3 sumIllumination = illuminationCenter;
for (int yy = -2; yy <= 2; yy++) {
for (int xx = -2; xx <= 2; xx++) {
const Float3 p = ipos + Float3(xx, yy,0) * stepSize;
bool inside = false;
if (p.x >= 0 && p.y >= 0 && p.x < width && p.y < height)
inside = true;
const float kernel = kernelWeights[std::abs(xx)] * kernelWeights[std::abs(yy)];
if (inside &&
(xx != 0 ||
yy != 0)) // skip center pixel, it is already accumulated
{
const Float3 illuminationP = m_accColor(p.x,p.y);
const float lIlluminationP = Luminance(illuminationP);
const float zP = frameInfo.m_depth(p.x,p.y);
const Float3 nP = frameInfo.m_normal(p.x,p.y);
const float varP = m_curFrameVariance(p.x,p.y);
// calculate the normal, depth and luminance weights
float nw = normalWeight(nCenter, nP);
float dw = depthWeight(zCenter, zP, maxDgrad, xx, yy);
float lw = luminanceWeight(lIlluminationCenter, lIlluminationP, var);
const float wIllumination = nw * dw * lw * kernel;
// alpha channel contains the variance, therefore the weights need
// to be squared, see paper for the formula(4.3 (1) (2))
sumWIllumination += wIllumination;
sumIllumination += Float3(wIllumination) * illuminationP;
sumVariance += wIllumination * wIllumination * varP;
}
}
}
// renormalization is different for variance, check paper for the formula
m_tmpColor(ipos.x, ipos.y) = sumIllumination / sumWIllumination;
m_tmpCurFrameVar(ipos.x, ipos.y) = sumVariance / (sumWIllumination * sumWIllumination);
}
}
std::swap(m_tmpColor,m_accColor);
std::swap(m_tmpCurFrameVar,m_curFrameVariance);
}Step Size为\(2^{i},i\in([0,4] \cap \mathbb{Z})\)
Cornell Box效果如下:
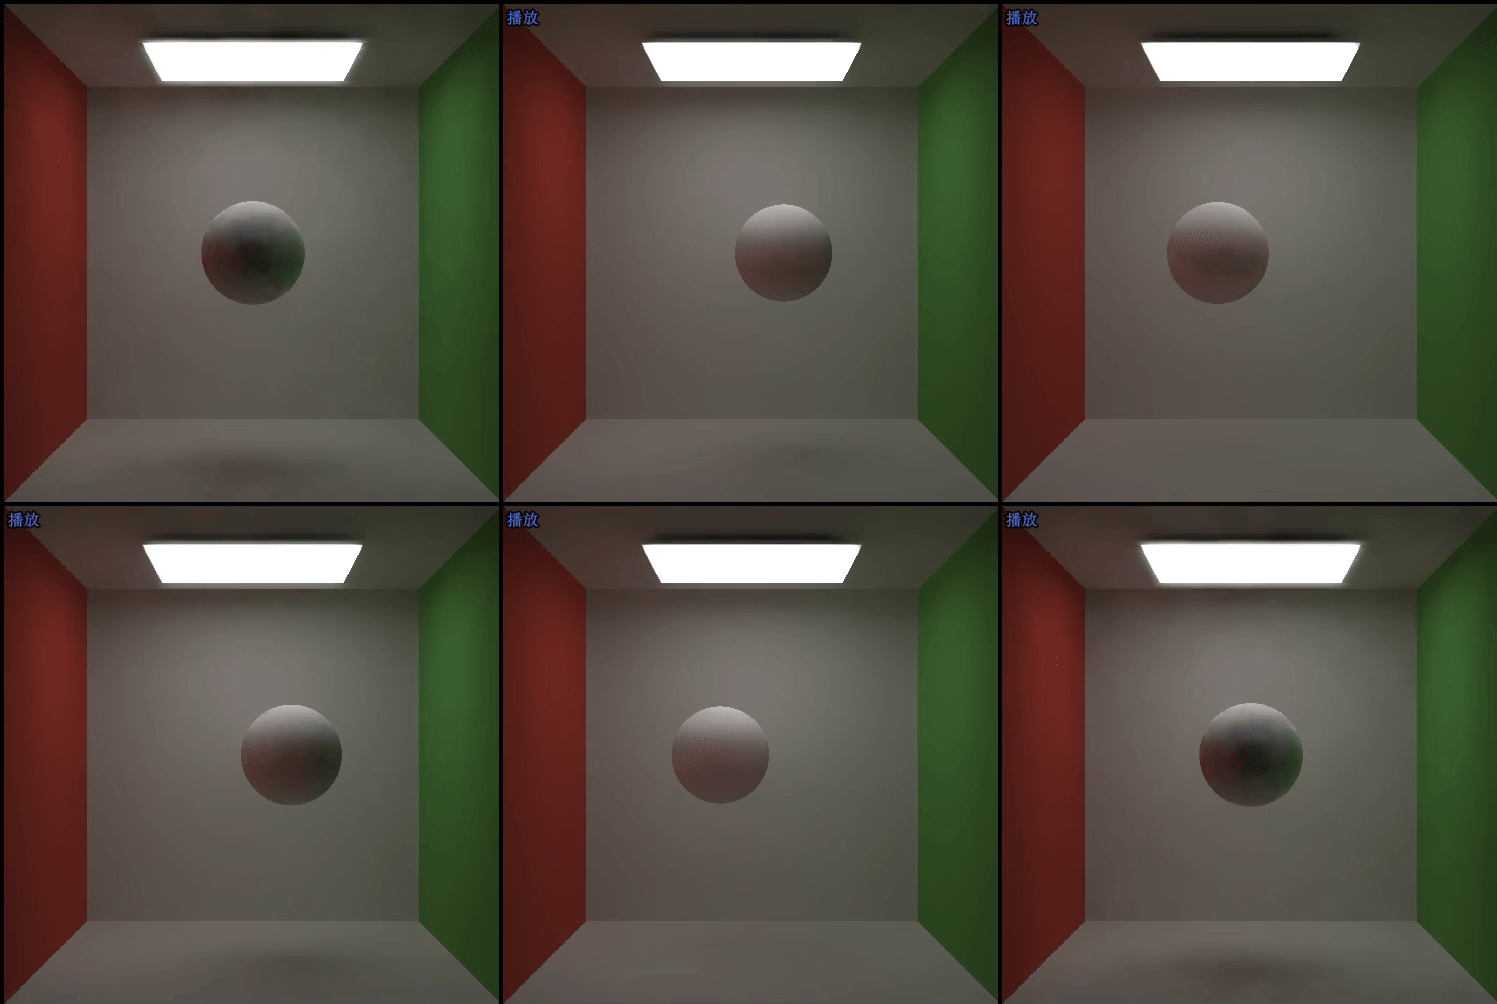
Pink Room效果如下:

这是降噪前的图片:

